


How to create contact sheet images with ImageMagick – convert, re-size, and crop images.

I had a web application requirement to display online aggregated images in a contact sheet format. A contact sheet is a fixed grid (m x n) of images where every image is the same size. The challenge here is, since the images are aggregated online, I do not know what the image type or dimension will be. The requirement calls for making each image display nicely in a 180×180 pixels square. This means that there will be some re-sizing and possibly cropping operations behind the scenes.
In this article, I will show you how to prepare any image for displaying in a contact sheet format programatically with the help of ImageMagick’s convert command line program.
Method #1
First, let’s get comfortable with the convert command line tool which will be doing all the image manipulation work. Go to your unix shell and issue this command to find out which version of ImageMagick you have.
[hostname]$ convert --version
Version: ImageMagick 6.6.9-7 2014-03-06 Q16 http://www.imagemagick.org
Copyright: Copyright (C) 1999-2011 ImageMagick Studio LLC
Features: OpenMP
In my ImageMagick installation, I have version 6.6.9-7 which means that it has a new resize fill feature which will resize and fill the pixel area specified. If your installation is below v6.3.8-3, then you will need follow the alternate method below which still uses the convert command but will execute additional steps to achieve a similar result.
Next, find a few images to test on. For my test, I used this jpeg.
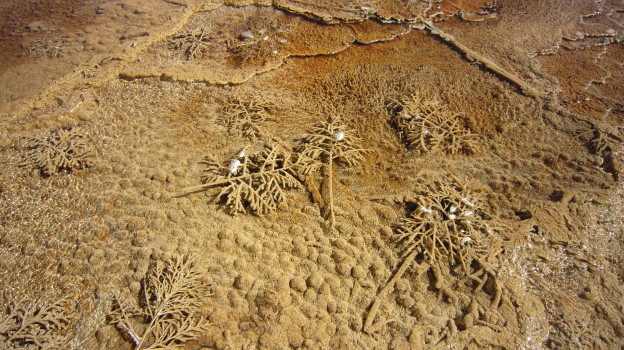
earth.jpg
I will use the convert command to resize and then center fit the resulting image into a 180×180 pixels box. Any overflow will be discarded, and if the image is less than 180px, it will be scaled up. Here is the command:
[hostname]$ time convert earth.jpg -resize 180x180^ -gravity center -extent 180x180 earth_filled_1.jpg

real    0m0.163s
user    0m0.116s
sys     0m0.024s
I included the time command to calculate the runtime. The time command is not necessary for image resizing and fitting. At this point, earth_filled_1.jpg is a jpeg that is 180×180 pixels in size.
Method #2
This method is for ImageMagick installations below v6.3.8-3. I will use the convert command to scale the image to at least 360px on length and width which is double the final size of 180px. This ensures that the resulting image will fit in a 180×180 pixels box regardless of the size and orientation of the image. Then center crop and resize the image to it’s final size of 180×180 pixels. Here is the command:
[hostname]$ time convert earth.jpg -resize 360x -resize 'x360<' -resize 50% -gravity center -crop 180x180+0+0 +repage earth_filled_2.jpg

real    0m0.330s
user    0m0.308s
sys     0m0.016s
I included the time command to calculate the runtime. The time command is not necessary for image resizing and fitting. At this point, earth_filled_2.jpg is a jpeg that is 180x180 pixels in size.
Comparison of both methods
In my test, I found that method #1 is both faster, and more importantly, gives better results when compared to method #2. Please take a look at the images from both methods.

earth_filled_1.jpg
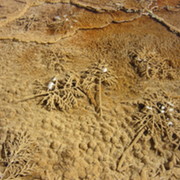
earth_filled_2.jpg
Integration with PHP
In integrating with PHP. I went with PHP shell exec. Here is a PHP class which implements method #2 above.
class ImageResizeHelper {
    private $input;
    private $output;

    public function __construct($input, $output) {
        if (empty($input) || empty($output)) {
            throw new Exception('both input and output must be defined');
        }
        $this->input = $input;
        $this->output = $output;
    }

    public function resize() {
        $command = 'convert ' . $this->input . ' -resize x360 -resize "360x<" -resize 50% -gravity center -crop 180x180+0+0 +repage ' . $this->output . ' > /dev/null 2>&1';
        $result = system($command);
        return $result;
    }
}
Here is an example of how I used the PHP class.
    $imageResizeHelper = new ImageResizeHelper($fullPath, $finalDestination);
    $result = $imageResizeHelper->resize();
Finally, I had this setup running in a production environment for several years without any problems.
02_LIVE_FEEDS_CONTACT_SHEET
Requirements
1. Unix shell
2. ImageMagick's convert command line program
3. PHP
Notes
1. http://www.imagemagick.org/Usage/resize/#space_fill
2. Does not work for animated gifs. You will need to use ImageMagick's identify program to detect and skip animated gifs.
3. All the convert examples are from ImageMagick's website.